
One of the biggest challenges when working with Power Apps and Power Automate is handling processes that take longer than two minutes.
By design, when an app calls a flow and the flow doesn’t respond within that time, Power Apps throws a timeout error. The flow may continue running in the background, but from the user’s perspective the experience is already broken: the app stops, shows an error, and there’s no visual indication of whether the process actually finished or not.
This situation is more common than it seems. Some real examples include:
- Synchronizing large volumes of data from a SQL database.
- Integrating with slow external APIs.
- Generating complex documents or reports.
- Performing intensive business calculations or internal migrations.
In all these cases, a Power Automate flow can take anywhere from three to ten minutes (or even longer).
If we try to run that process directly from Power Apps and wait for the response, the app will fail at the two-minute mark, even if everything went perfectly fine in the background.
The problem: the timeout breaks the user experience
When a process fails due to a timeout, it’s not just a technical error:
- The user assumes something went wrong, even if that’s not the case.
- There’s no clear feedback or way to know whether the flow has finished.
- The action button might remain active, allowing multiple parallel executions, risking duplicated data or inconsistencies.
- There’s no way to “wait” in Power Apps without blocking the interface.
This creates unnecessary friction in real business scenarios, where the robustness and predictability of actions are essential.
Synchronous vs asynchronous: why this limit matters in Power Apps
Before diving into the solution, it’s worth clarifying a fundamental concept: the difference between synchronous and asynchronous execution, and how Power Apps internally handles calls to Power Automate.
Synchronous process:
A synchronous process is one in which:
- The application starts an action (for example, calling a flow).
- It then waits for the response before continuing with the rest of the execution.
- If the response is delayed, the application remains blocked while waiting.
A simple example: when you click a “Save” button and the screen doesn’t let you do anything else until the save operation is complete.
In Power Apps, when you run something like:
Set(varResult, 'MyFlow'.Run())The app waits for the flow’s response.
If the flow returns a result before the time limit, the app continues normally.
If not… the timeout is reached, and an error appears.
Asynchronous process
An asynchronous process, on the other hand, works differently:
- The application starts the action.
- It doesn’t remain blocked waiting for it to finish.
- It can continue executing other tasks while the action runs in the background.
- The result is retrieved later, when it becomes available.
A common example: when you upload a file to a server and can keep using the website while the upload completes.
Power Apps doesn’t have a native asynchronous wait mechanism (there’s no await like in traditional programming languages).
That’s why, if you need to handle long-running processes, you have two options:
- Accept that the app will throw an error if it takes longer than two minutes.
- Or design your own controlled asynchronous pattern, which is exactly what we’ll do in this article.
The idea: simulate synchronous behavior without blocking the app
To solve this, we use a simple yet powerful pattern:
- The flow responds immediately to Power Apps, without executing the heavy logic within the same call.
- The flow runs the actual process in the background (for example, a SQL synchronization) and sets a flag in the database to indicate that it’s running.
- The app disables the button and shows a “Synchronizing…” state, simulating a waiting period.
- A Timer in Power Apps checks every few seconds (polling) whether the process has finished.
- When the flag changes, the app displays a success message and re-enables the interface.
In this way, we’re not actually blocking the app or truly waiting… but for the user, the experience feels exactly as if the call were synchronous.
A real example: data synchronization with SQL
Imagine you have an app where users trigger a data synchronization with a SQL database.
The entire process takes between 3 and 5 minutes, if you launch it directly from Power Apps, it will fail.
With this pattern:
- When the user clicks “Synchronize”, the app calls the flow → the flow responds immediately.
- The app disables the button and shows a visual “Synchronizing…” state.
- Every 10 seconds, the app checks in SQL whether the
IsSyncingflag is still active. - When the flow finishes, it updates the flag to
0. - The app detects it, notifies the user, and re-enables the interface.
For the end user, it feels as if the app has been waiting for the result, but without freezes, without errors, and with clear visual feedback.
The interesting thing about this approach is that the button can remain blocked even if…
Now let’s get started:
Step 1: Create the flag table in Dataverse
The first thing we need is a place where both Power Automate and Power Apps can read and write the process status.
Create a table in Dataverse called Synchronization_Flag (or any name you prefer) with the following fields:
| Field Name | Data Type | Description |
|---|---|---|
| Name | Texto | Name or identifier of the process. Example: “SQL Synchronization”. |
| IsSyncing | Sí/No (booleano) | Indicates whether the process is currently running (true) or has finished (false). |
| LastSyncDate | Fecha y hora | (Optional) Stores the timestamp of the last successful synchronization. |
You can keep a single record if there’s only one synchronization process, or multiple records if you plan to handle different types of processes.
In my case, I’ll go with the latter approach.

Step 2: Create a test flow in Power Automate
We’ll now build a flow that simulates a long-running process (three minutes, for example) and updates the flag before and after it runs.
Here’s the complete flow; we’ll break it down step by step afterward.

Let’s walk through the flow step by step:
2.1. Create the flow inside the solution with the PowerApps (V2) trigger.
2.2. Respond to the app immediately: This action returns a response to Power Apps right away to avoid the timeout. The flow will continue running in the background.

2.3. Get the flag from Dataverse: Retrieve only the first record of the flag with its two columns, the ID and the status (IsSyncing).
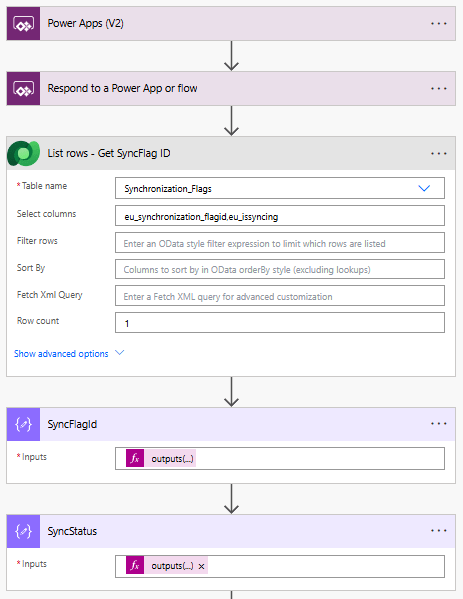
SyncFlagId Action:
outputs('List_rows_-_Get_SyncFlag_ID')?['body/value']?[0]?['eu_synchronization_flagid']SyncStatus Action:
outputs('List_rows_-_Get_SyncFlag_ID')?['body/value']?[0]?['eu_issyncing']2.4. Check if it’s not currently syncing:

Left side of the condition
outputs('SyncStatus')Right side of the condition
false2.5. If it’s not syncing: Set the flag to “Syncing”.

Row ID
{outputs('SyncFlagId')IsSyncing: Yes
2.6. 3-minute delay: This simulates the action you want to perform in the app, one that takes too long to be handled as a truly synchronous process.

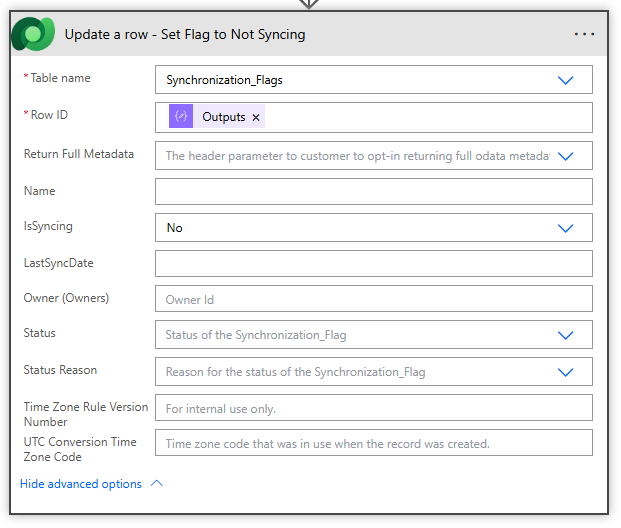
2.7. Set the flag to “Not Syncing”: This allows the app to check whether the process is still running or has already completed.
Step 3: Configure the app in Power Apps
With the Power Automate flow ready and the synchronization flag set up in Dataverse, it’s time to build the visual part in Power Apps.
The goal:
- The user clicks “Synchronize”
- The button remains disabled while the process is running
- And the app automatically detects when the flow finishes
On your screen, create the following control hierarchy:

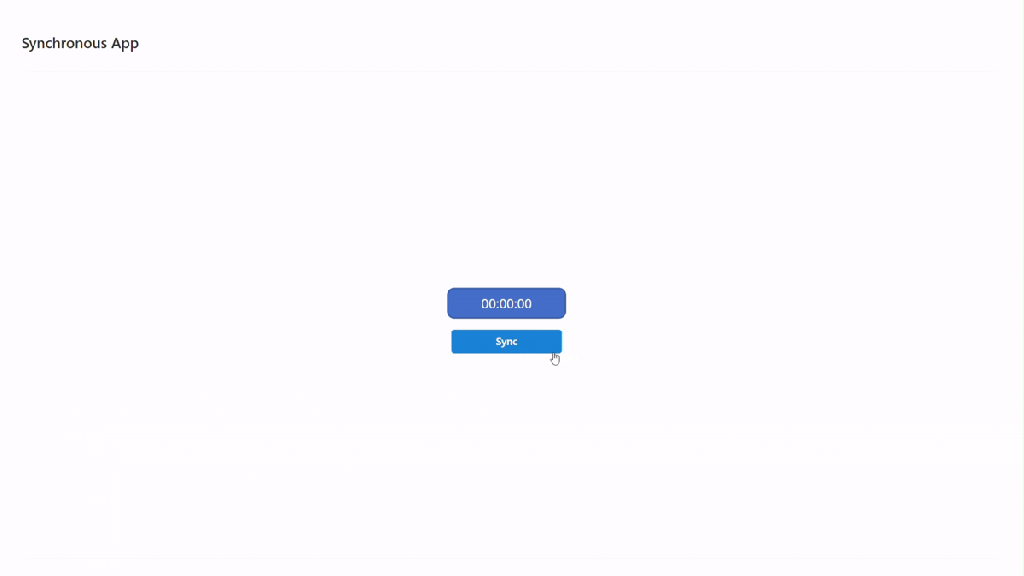
This design groups all the visual synchronization logic inside Container2, which contains both the button and the spinner.
3.1 Visibility configuration
To create the “disabled button” effect:

Spinner1, Visible:
_VarSyncing_ButtonCanvas1, Visible:
!_VarSyncing_In this way, while the process is running (_VarSyncing_ = true), the button will disappear, and the animated spinner will be displayed.
When the process finishes, the spinner will be hidden, and the button will become visible again.
The visual result is a smooth “waiting” state without needing to block the entire application.
3.2 “Synchronize” button action
En la propiedad OnSelect del botón (ButtonCanvas1), escribe el siguiente código:
Refresh(Synchronization_Flags);
If(
    First(Synchronization_Flags).IsSyncing ,

    // If it is syncing
    Set(_VarSyncing_, true);
    Set(_VarStartTimer_, true),

    // If it is NOT syncing
    Set(_VarSyncing_, true);
    Set(_VarStartTimer_, true);
    Flow_Sync_Test.Run()
)
What this formula does:
- Refreshes the Synchronization_Flags table from Dataverse.
- Checks whether the IsSyncing flag is active.
- If it’s already syncing, it only activates the local variables to keep the spinner running.
- If it’s not syncing, it launches the flow (
Flow_SyncTest.Run()) and activates the spinner as well.
Result: The user sees the button instantly disabled after clicking, while the flow starts and responds to the app.
3.3 Verification timer (polling)
Now we need Power Apps to “listen” periodically to check whether the process has finished.
To do this, select the Timer1 control and configure the following properties:
Duration:
10000AutoPause:
falseRepeat:
trueStart:
_VarStartTimer_OnTimerEnd:
Refresh(Synchronization_Flags);
If(
    !First(Synchronization_Flags).IsSyncing,
        // If it is NOT syncing
        Set(_VarStartTimer_, false);
        Set(_VarSyncing_, false)
)
In this way, every 10 seconds the app:
- Refreshes the Synchronization_Flag table from Dataverse.
- Checks the IsSyncing field.
- If it detects that it has changed to
false, it stops the Timer and hides the spinner.
Result
When the user clicks “Synchronize”:
Power Apps detects the change, stops the Timer, and displays the button again.
- The Flow_Sync_Test flow is triggered.
_VarSyncing_is set totrue, showing the spinner._VarStartTimer_starts the verification Timer.
Meanwhile, the flow executes its long-running process (simulated with a Delay). Once finished, it updates the IsSyncing flag to false in Dataverse.
All of this happens without freezes, without timeout errors, and with a smooth, seamless user experience.
Conclusion
The two-minute limit between Power Apps and Power Automate may seem, at first glance, like a difficult barrier to overcome. However, as you’ve seen, it’s not an insurmountable technical problem, it’s an architectural design challenge.
Instead of trying to extend the waiting time or “force” synchronous behavior, the key lies in simulating synchrony in a controlled way, separating the process execution (the flow) from the user experience (the app).
With a simple control table in Dataverse, a small verification loop using a Timer, and a flow that updates the status, we achieve a completely smooth experience:
- The app responds immediately, without timeout errors.
- The user perceives that the system is “waiting” for the result.
- The interface remains locked and synchronized with the real process state.
This pattern not only solves the SQL synchronization case, it can also be applied to large data loads, slow integrations, or complex business processes that take several minutes to complete.
💡 Ultimately, it’s about making smart use of Power Platform’s capabilities: letting Power Automate handle the heavy lifting, while Power Apps manages the communication and user experience.
A perfect example of how to combine asynchrony and state control to build a robust, user-friendly, and professional application. 🚀


Leave a comment